Inhaltsverzeichnis
The problem of identifying increased oil consumption… or where does the engine oil go?
The other day I was asked how to determine what the problem is when you check the oil and find that there is a permanently increased oil consumption.
If there is a visible leak, it's easy: you just seal the part where the oil is leaking out.
The problem with fault diagnosis begins when the engine is dust-dry on the outside and no irregularities are detected when the engine is running.
Where do you start looking?
Basically, you first have to answer the following questions:
- is an oil used that is approved by the manufacturer
- who added how much oil and when
- How much oil does the engine consume per hour
- How long have you been monitoring the oil consumption
- Have any repairs been carried out recently
- Did you notice anything during a previous maintenance
- How do you check the oil level correctly
It is possible that an increased oil loss will be detected if you tow more gliders with the aircraft.
This may be due to oil loss through oil mist leaking from the breather hose of the oil tank.
Since there is no oil separator in the hose is, the oil mist is blown into the environment and detected as oil loss in the oil tank.
Check the oil level
Unfortunately, one of the biggest problems is checking the oil level in the oil tank correctly.
The operating manual says the following about this:
| Step | Procedure |
|---|---|
| 1 | Check the oil level and top up if necessary. |
| 2 | NOTE: the propeller should not be turned against the normal direction of rotation. Open the oil tank cap. Turn the engine a few revolutions by hand in the direction of normal engine rotation to pump the oil from the engine into the tank. |
| 3 | It is important that the compression pressure is built up in the combustion chamber. Briefly maintain the pressure so that the gases can pass through the piston rings into the crankcase. The speed of rotation is not important, but the pressure and the amount of gases that enter the crankcase. |
| 4 | The process is complete when air also flows back into the oil tank. This can be heard as a gushing (gurgling) sound when the oil tank cap is open. |
| 5 | Close the oil tank cap. |
NOTE: Difference between max. and min. mark = 0.45 liters.
That sounds simple, but it is not (see also here).
The instruction is part of the pre-flight check. Now the question is when the oil level check is actually carried out. I have observed that many pilots first take the plane out of the hangar, walk around it 37 times and also check the oil and coolant levels at some point.
This means that it is not clearly defined how the plane is positioned. However, this is necessary for a proper determination of the oil level, because the amount of oil pumped back into the oil tank by turning the propeller is essential for the measured oil level.
This procedure is also OK during normal operation of the aircraft.
However, if you want to measure the oil consumption, the oil level should always be checked under exactly the same conditions.
This means that the oil level should be checked when the aircraft is at its parking place and has not yet been moved.
So always under the same conditions!
I go a little further with my recommendation here:
The oil level should be checked directly after the flight in the hangar.
The reason should be obvious: the engine oil is always at approximately the same temperature and the aircraft is always in the same position. An additional advantage is that the engine oil is naturally thinner and can therefore flow more easily out of the crankcase through the blowby gas into the oil reservoir.
Unfortunately, there is one important restriction: this procedure should only be used if the aircraft is always flown by one person. In the case of a club or multiple pilots, one person unfortunately does not know what the other is doing. In this case, check before the flight.
Document consumption
 Once the procedure for checking the oil level has been determined, you can start documenting the addition of oil.
In principle, I recommend a sealable bottle with a measuring scale, as shown, for refilling when you have to determine the exact amount. These can be found in motorcycle accessories for mixing 2-stroke fuel. This should allow the exact amount of oil to be measured and the bottle to be closed afterwards, so that the oil and the surrounding area remain clean.
Another possibility is to weigh the amount of oil removed from the can.
Unfortunately, this requires a scale (electronic kitchen scale with tare function) and a calculator. The density of the engine oil (840 g - 880 g per liter) must then be consulted to calculate the amount of oil.
the determined oil consumption
The operating manual states that the maximum engine oil consumption is 0.06 liters per hour.
That is 60 milliliters or about 51 grams per hour.
However, it is hardly possible to determine this oil loss after one hour of flight, considering that the difference between the two marks on the dipstick corresponds to an oil quantity of approx. 450 ml and that the difference to the max mark on the dipstick is quite small.
It therefore makes sense to fly for 5 hours and then top up the oil level to maximum and measure or weigh the refill quantity. This should not exceed 0.3 L or 255 g and should therefore be an amount that can be determined accurately.
...where does the oil disappear?
If the amount lost is greater than permissible and the engine is dry, it is now the research task to find out.
Basically, there are not many possibilities:
- piston seizure
- incorrectly fitted piston rings
- broken piston ring
- worn cylinder set1) or increased play of the rings in the ring groove
- Worn valve stem seal
- Valve stem worn at the seal
- Defective or worn valve guide
We will assume that we have an unremarkable pressure loss test. This means that we have a pressure loss of less than 10% on the individual cylinders.
This allows us to rule out two things: a piston seizure and oval valve seats (oval valve seats will be discussed later).
If there was a piston seizure, too much pressure would escape here, the engine would probably have a loss of power, would start badly, you might hear a rattling sound and there would be a good cloud of smoke coming out of the exhaust.
Furthermore, you can rule out incorrectly fitted piston rings if no repairs were carried out on the engine or oil consumption did not occur from that point on.
At points 5 to 7, we would probably have an oily spark plug.
If we continue to assume that the spark plug appearance is also normal, it becomes very difficult and in the end the only thing that helps is an exhaust gas measurement or to disassemble and measure the bearing sets.
If you don't want to partially disassemble the engine, the only thing left to do is to measure the exhaust gas. I can give you the tip to contact the TÜV or DEKRA (in Germany). The field inspectors usually have a mobile exhaust gas tester available on request and are happy to measure the exhaust gas values of an aircraft, for the usual fee, of course.
Unfortunately, Rotax does not provide any values that can be used to diagnose increased oil consumption.
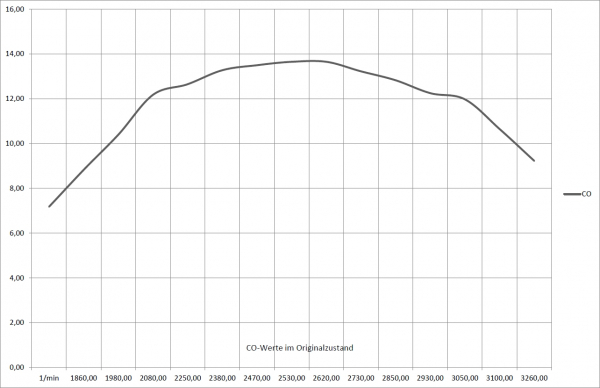
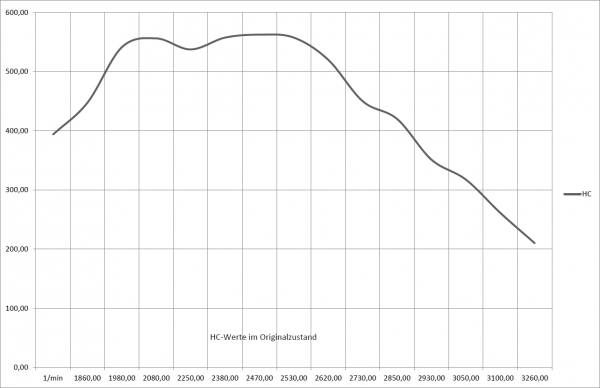
However, I do have two graphics that show the exhaust behavior on the test bench of a completely overhauled 912 ULS.
The values in the lower RPM range represent the average of the measurements taken at all four individual cylinders, and thus theoretically correspond to the values at the exhaust tailpipe. I would like to emphasize that these are only reference values, since the exhaust behavior can vary greatly depending on the flow to the engine and explicitly the intake manifold and their temperature.
 The CO values
should not exceed 14% if possible, otherwise the engine can no longer “process” the mixture that is too rich for it and starts to shake.
However, this is not caused by increased oil consumption, but by a carburettor problem.
 The HC values
indicate unburned hydrocarbons – which may also contain oil.
The diagnosis of increased oil consumption in connection with the CO values is to be seen here. In principle, however, the CO values should indicate an intact mixture preparation (carburettor).
What is noticeable in the exhaust gas measurement is an extreme increase in the values directly after idling, which is due to the carburettor design.
This means that we have to carry out the measurement in a range where we are sure that we have reasonably normal values.
I recommend about 3000 rpm here. Then we would have approx. 12% CO and just under 350 ppm HC.
If the HC value is increased (over 500 ppm), it is now indicated whether an increased oil content plays a role in the combustion.
Then, of course, a diagnosis of the displacement parts must be carried out - in other words, a partial disassembly of the engine.
Of course, this work can be done with the engine installed.
